Disc-O-Tech
DISC-O-TECH
Stop on a dime department
Awesome stopping power for virtually any Mopar with lowbuck stock parts – plus some racecar tricks!
Text and Photos
by Richard Ehrenberg
Everybody knows Mopars run like the proverbial scalded cat. Most Mopars even had decent stopping power, what with fat 11-inch drums or optional discs. However, as the pace of speed technology has hammered away at elapsed times, the braking scene, vis-a-vie our classic Mopes, has pretty much maintained the ol’ status quo. For drag cars, there’s always the option of the neat-o Wilwood kits, but they arenÂ’t streetable. Anyway, for many of us, it’s low buck or walk! What weÂ’ve always needed is a way to upgrade our braking systems, be it from drums to discs, or, maybe even more importantly, from the now-rare (and expensive) 60s 4-piston disc setups to bigger, simpler late-’70s-based, single-piston stuff.
In the mid 1980s, this author wrote and published the definitive Mopar disc-swap article. In the interval since, weÂ’ve published several updates and revisions, keeping pace with this supply-side reality: some parts are getting to be harder to find. So for this, a truly “master revision” (in computerese, this is V.2.0), we intend to instruct you on a swap to bring your Mopar’s brakes up to snuff, using currently-available parts, with sourcing almost exclusively via boneyards, your local Chrysler dealer, and the corner auto-parts store. We’ll totally avoid megabuck reproduction parts, one-off custom pieces, and expensive “race” parts. This conversion, or parts thereof, will work on virtually every Mopar built from 1962 through 1989, whether originally equipped with standard drums, HD drums, or discs, and now weÂ’ve even got help for those kiloton C-body bruisers. The main thrust of this information will be concentrated on those cars that need the help the most: ’62-’72 B-Bodies (including Road Runners, Chargers, GTXs, Satellites, etc.) and the much- loved E-body ponycars (Challengers and ‘70-up ‘Cudas.) These cars all use a virtually identical front suspension layout, the only real differences being the swaybar design (which varies somewhat from year to year) and, of course, the brakes. Then, we’ll detail some specific information for the “rest” of the Mopar tribes out there, including later cars and A and C-bodies. This will be a totally bolt-on deal, requiring absolutely no fabrication, cutting, or welding. Proper OEM suspension geometry and hose routing will not be compromised. And then weÂ’ll go “one step beyond”, detailing a swap for track vehicle owners who would like the big, cheap Mopar rotors and the advantages of lightweight aluminum 4-piston calipers. Other than a typical “Sears, Roebuck” set of hand tools, the only item that would be useful to have handy would be a ’70-’72 factory service manual.
STARTING POINT
Mopars of our “prime target” group came factory-equipped with one of two different possibilities for drums (10″ and 11″) and two possible disc setups (Bendix 4-piston on the ’66-’69 cars, and single-piston Kelsey-Hayes pin-type on the ’70-’72s) All the disc-brake-equipped cars of this era used two-piece rotor/hub assemblies (see fig. 1) Besides being expensive to replace (even the current repros arenÂ’t cheap), these were a major hindrance to achieving truly high performance braking. If the rotors got hot enough, by either very exuberant braking or by installing metal compound lining material, the rotors would warp, resulting in a very unnerving, pulsating brake pedal. The rotors would usually return to a semblance of straightness when they cooled, but this setup obviously left something to be desired. Later B-bodies used a “unicast” (one-piece cast iron) hub/rotor assembly, solving the warpage problem, but opening another can of worms, namely, hub, strength. A sudden impact, or years of vibration and road shock have been known to cause hub failure, something you don’t want to experience. Yeah, watching your wheel/tire/hub combo bouncing aimlessly over a freeway median at 75, as you scrape to a sudden, sparky, halt is not high on our list of fun ways to spend the weekend. The factory finally got their act together in 1976 with the introduction of the 11.75″ unicast police rotors with cast-in reinforcing ribs (see fig. 2). It’s these rotors that we’re going to install on our subject car, a ’71 383 ‘Cuda. WeÂ’ll deal with the actual how-to-do-it part of this swap with a set of detailed captioned photographs, which will walk you through the entire procedure, step-by-step.
Click On Pictures To Load Full Size
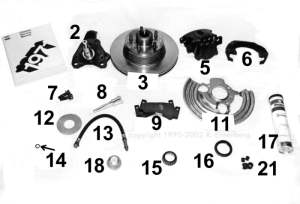
Here’s everything you’ll need to get the job done. Redundant parts, which are used in duplicate on the opposite side of the car, are not shown.
Numbers are keyed to the parts list.
PARTS PROCUREMENT and OPTIONS
On all Mopars, the swap from drums to discs (or 2-piece rotors to unicast rotors) requires one “key” part: A new steering knuckle (a/k/a “spindle.”) The knuckle you need for our primary swap is from any ’73-’74 E-body, or, believe it or not, any ’73- ’76 disc-equipped A-body (Valiant/Dart/Duster). This is a non- wearing part and perfect examples can be had at most junkyards (see phto below), but if you run into trouble, excellent repros are now available from Master Power Brakes, Inc. Do not succumb to the temptation to use “lookalike” knuckles from later Mopars, such as 73-up B/R-bodies, F/J/M bodies, etc. These parts, while visually very similar, are taller, altering suspension geometry (camber change, bump steer, etc.), and possibly forcing the ball joints beyond their designed range, a/k/a “over angling”. Also do not swap the knuckles side-to-side to mount the caliper toward the rear, this causes brake hose routing difficulties. While the correct mounting avoids these problems, on some cars you may encounter swaybar-to-caliper interference. We suggest dealing with that via other methods, described later. Using the correct knuckle avoids any of these potential pitfalls, and results in a “factory engineered” installation. Hey, Chrysler paid those engineers big bucks to get it right, so you might as well take advantage of their knowhow. Plus, we’re getting it for free!
This will help you identify the needed ‘74-‘74 E-body / ‘73- ‘76 A-body steering knuckle. Casting numbers are rarely visible, so comparing dimensions is the sure way. Be sure to inspect for spun-bearing damage. Exact, drop-forged steel repros are available from Master Power (see sources.) Do not use the similar, but taller, knuckles from ‘73-up B and F/J/M/R-body cars!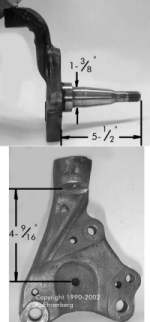
You’ll also need a pair of rotors and caliper adapters (a.k.a. brackets) from most any ’76-’79 B-body or 79-up R-body (St. Regis, etc.) Be careful when perusing the boneyards for theses, as Mother Mopar pulled off quite a bit of “badge engineering” in this period, resulting in some B-bodies carrying traditional C- body nameplates. The sure cure: check the VIN tag. Find an R, W, X, or S as the first character, and you’re home free. Note also that many 2-door B-bodies (X, S) of that generation, as well as the R-bodies, used the “slider” type calipers, which we donÂ’t like as well as the K-H pin type (they require more maintenance), but if thatÂ’s all you can find, go for it, and repros of them are also now being sold by Master Power. (It has also become very difficult to find new ‘pinsÂ’ (bolts) for the pin-type calipers.) You’ll also need a pair of rebuilt calipers and the correct hoses (see parts list), which you can usually find inexpensively at a local parts house. (Should you decide to go with the slider calipers, use hoses from a ‘73-‘76 A-body).
On the left are two of the desired unicast rotors. The reinforcing ribs are clearly visible – make sure the ones you use have ‘em! On the right is one of the early two-piece rotors. The pencil is pointing to the hub/rotor junction point.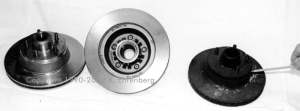 #4 and #5 are our two K-H pin-type calipers, left and right sides. The unnumbered caliper on the right is a later B-body slider. Note difference in hose fitting location. DonÂ’t use this design on the “target” group of cars (see text).
#4 and #5 are our two K-H pin-type calipers, left and right sides. The unnumbered caliper on the right is a later B-body slider. Note difference in hose fitting location. Don’t use this design on the “target” group of cars (see text).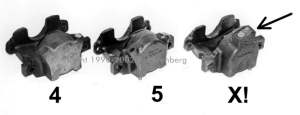
Additionally, besides the obvious parts such as pads, wheel bearings and seals, splash shields, etc., you’ll need, (only) if you now have drums, a master cylinder from virtually any ’70-up disc car, even one from such common junkyard dogs as a 1976-78 F-body (VolarĂ©/Aspen.) Later cars (’79-up) used a neat, lightweight aluminum master cylinder, but it was attached to the firewall (or vacuum booster) via only two bolts, as opposed to the earlier 4-bolt arrangement, requiring an adapter plate (Mopar Performance P5249305 or AR Engineering MC1002) to install. Alternately, you may be able to adapt a later 2-stud booster. Next, you’ll need a rear brake proportioning valve. The valve may be of the stock non-adjustable variety (which, in some years, was built into the brake tee assembly.) Ideally, though, for ease of installation and, more importantly, optimization of front/rear braking balance, the Mopar Performance/Wilwood “add-on” adjustable valve, Mopar #P5249088 (or similar) is highly recommended, and, therefore, was used in our swap. The standard, nonadjustable valve was, of necessity, a compromise. The same valve was used on wagons and 2-door coupes, slant sixes and Hemicars, meaning that most cars rolled out of the assembly plant with less-than-ideal proportioning, characterized by a tendency toward early rear-wheel lockup.
There are other ways to alter front/rear balance. One way, which reduces rear lockup, is to use a 7/8-inch rear wheel cylinder in place of the standard 15/16-inch unit. Try Raybestos part number WC37236 for this. (Original application: late ‘70-early ‘80s light-duty Dodge trucks w/10-in. rear drums).
The second variable is caliper piston size. The slider-type calipers used on 1973-‘75 A-bodies used a smaller piston: 2.60″ as opposed to the more common 2.75″. Using these can be helpful if your car has a “reverse” proportioning problem and tends to lock the fronts first, usually only a problem with no-option, slant-six cars or lightened drag cars.
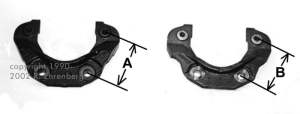 The caliper adapters for the 11.75″ rotors measures 3.5″ (dim. “A”) from the center of the “pin” holes to the center of the mounting holes. The optional adapter (for 14″ wheels/10.87″ rotors) measures 3.125″ C-C (Dim “B”). Slider adapter are also made for each of the two rotor sizes. Measure from the center of the mounting hole to a flat surface. If itÂ’s 3-1/4″, it fits the small rotors, 3-5/8″ fit the biggies.
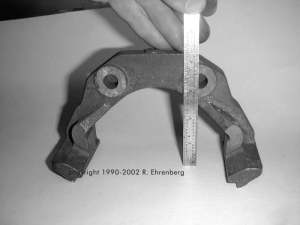
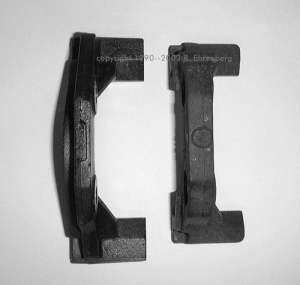 Slider calipers were produced in “standard” and “H.D.” versions. Note ribbing and extra iron on the H.D. baby on the left. These two adapters are 100% interchangeable
Some factory installations, notably C-body and later B-body cars, used a “combination” valve, which also included a front-brake metering valve. Its function was a allow the rear brakes to achieve some minimal line pressure (against the return springs) before the fronts began to apply. This was supposed to reduce the possibility of the fronts locking up first on glare ice. Don’t worry about this, besides, with the rears locked first, the car must spin. In addition, none of these valves are no longer available new, repops are from who-knows-where, and most available junkyard samples all seem to be made of cast iron (instead of brass) so they’re rust city. Again, your best bet is to just leave your stock “tee / switch” assembly unmolested and plumb in an adjustable valve in the rear line, as we’ve done in our swap.
As we mentioned, you will encounter swaybar-to-caliper interference if you install this setup on a pre-1970 B-body equipped with the link-type swaybar. Your alternatives here are an aftermarket swaybar setup (Addco, etc.) or to convert to the ’70-’72 setup. This swap requires either using lower control arm/swaybar bracket assemblies from the ’70-’72s, or torching the brackets off your original arms and rewelding them in the ’70-’72 location (you’ll still need the ’70-’72 bar itself). In some cases, pre-’70 cars may not have the clearance notch required for the ’70-up style bar, which passes through the K-member. To cure this, either swap to a ’70-up K-member, use an aftermarket bar, or rework the K-member.
Don’t worry if it looks like a lot of parts. Many of the components can be had at least partially preassembled. The parts are garden variety and usually quite inexpensive. For example, we paid ten bucks for a pair of the caliper adapters at local auto wrecking yard. The knuckles were obtained gratis from a neighbor who was junking a ’75 Valiant. Our local auto parts store once had the rotors on sale for $39.95, brand new! A shrewd shopper should be able to pull off the whole shebang for $300 – 400 and have enough left for a large pepperoni pizza. And, if you hate shopping for lots of small parts, Master Power Brakes, Inc. now offers a complete clone of this setup (small rotors only) ready to bolt on.
OUT BACK
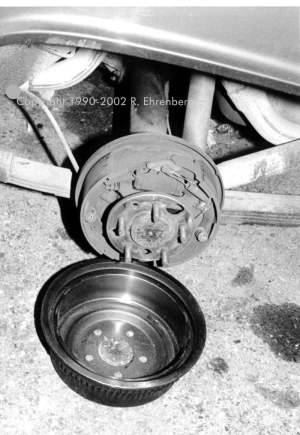
Whether or not you your car was originally disc-equipped, it may have either 10 or 11-inch rear drums. Either setup seems to do just fine. (Just be sure they’re in good shape). The front brakes do 60 to 70% of the braking anyway, and with your humongous new 11.75″ rotors and semimetallic pads up front, you’ll have no shortage of stopping power.
Much has been written about rear discs. Everybody lusts after the early-‘70s Imperial units. In a word, donÂ’t! Chrysler engineers have told me, point blank, that the only reason they went to 4- wheel discs on any car (possibly excluding the Viper) was “competitive pressure”. They feel thereÂ’s little performance gain. Then thereÂ’s the fact that the Imp parts are now scare as henÂ’s teeth, and require custom-length axles to install on 8.75″ axles (unless you want to give up your beefy Timken rear wheel bearings for rinky-dink ball-type bearings.)
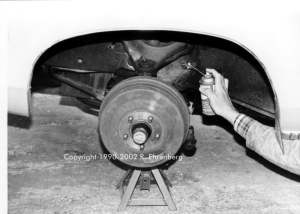 Let the games begin! Step one, after safely supporting the vehicle on stands, is to soak the hose fitting with rust penetrant. Then unscrew the hose fitting and remove the retaining clipNow remove the drum in the usual manner. Save, and recycle, the outer wheel bearing, thrust washer, nut, and the nut lock. Unbolt the knuckle from the backing plate and ball joint, as shown. The separate the upper ball stud from the knuckle by using either the factory puller or a pickle fork. If you use the fork, you’ll probably ruin the upper seal, which must be replaced.
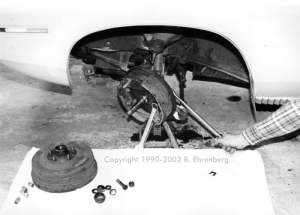
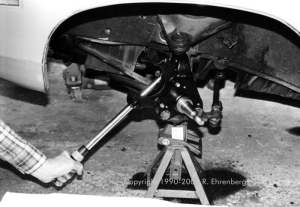
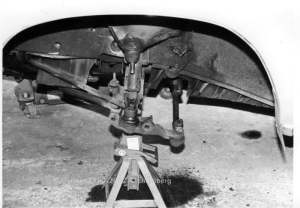 Pull the old stuff off the car, and the teardown is complete. Of course, if you plan on doing any additional front-end work, now’s the time!New knuckle bolts in place exactly the same way as the old one came off. Re-use the old ball joint bolts, with thread locking compound, torqued to 120 ft./lbs. Then bolt the adapters in place, and torque to 95 ft./lbs, as we’re doing here. Use only the bolts shown in the parts list for this application – no substitutes!
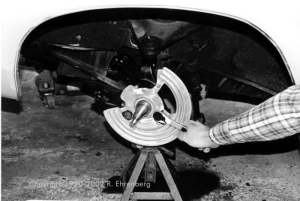 Install the new splash shields, using the foam gaskets (item #12 in the parts chart) and ordinary dime-store 5/16-18 X 3/4″ screws. if you can’t find shield, don’t fret. Experience — and a look at a modern car — shows that they are really just eye candy.Pack the wheel bearings in the usual way, and install the seal. Mopar hi-temp lube (p/n 4318064) is the ticket!
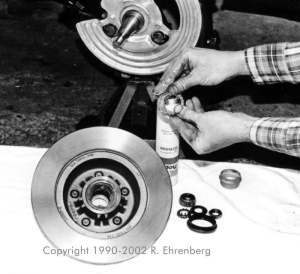
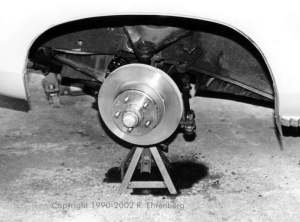 Real, visible progress! We’ve installed the rotors, adjusted the bearings, and installed the dust new dust cap. With discs, there must be zero end play. Tighten until the play just disappears, then a skosh more. If you chintzed out and used Chinese aftermarket grease caps, spin the rotor a few times, then pop the cap off (look for witness marks) to be sure that the cotter pin isn’t scraping the inside of the cap — filling your bearings with metal chips! A real tight wrap of the cotter, and an undented cap, is necessary to prevent this. Screw the flex hoses onto the calipers before installation. Don’t forget the copper washer (pencil.) If your calipers came without the rubber bushings in place, install them now. Slider calipers require two copper washers, and the banjo bolt (p/n 6030026).
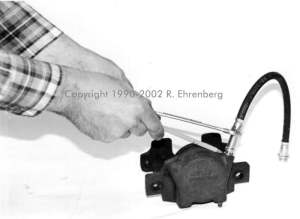
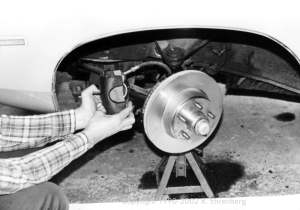
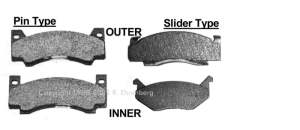 Pay careful attention to the subtle difference between the inner and outer pads. Outer pads also typically have thicker lining. After what seems like an eternity, we can now get super, molded, metallic-carbon pads from Firm Feel, Inc. (See sources)Before installing the caliper, drop the inner pad in to place between the adapter and the rotor- it’s just barely visible in this photo. Now, slip the outer pad inside the caliper’s outer flange. Holding the outer (pin type) pad in place by hand, slip the caliper into position.
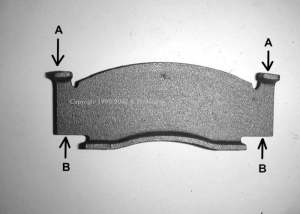 Sliders need to have the outer pad custom-fitted to the caliper. Hammer the tabs (A) while supporting the bottom edge (B) on an anvil, brick, etc. The pad should just barely “snap” into place on the caliper. Too loose? WonÂ’t fit? Bend again!Install the guide pins, and torque ’em to 35 ft./lbs. Note that some jiggling may be required to line everything up. If you find any anti-rattle springs, clips, etc., packed with your calipers or pads, just toss ’em over your shoulder! If you are using the slider-type calipers, there are no bushings or pins, just the retainers and small screws. With the slider setup, be sure the “ways” are smooth and lubed with silicone grease.
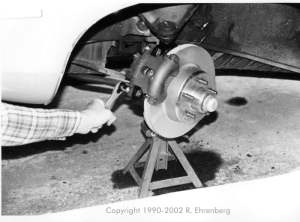
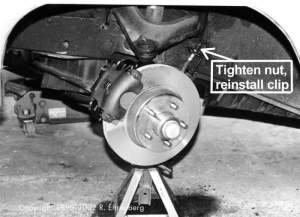 Slip the flex hose into the frame bracket, and reinstall the clip. Tighten the original steel line (arrow) into the new hose, Congrats! You’ve finished one side. Look at all the pictures in a mirror to complete the passenger’s side! Bleed both calipers using your favorite method: gravity, pumping, or pressure. Be sure you have a firm pedal before moving the car. A quick trip to the alignment rack, and it’s a done deal! (Remember, a little negative camber goes a long way towards improving cornering grip).Here’s the completed installation in the slider-caliper version. Note that in all cases the calipers are on the front – this maintains factory specifications for hose routing, saving your butt. Resist the temptation to reverse them, unless you are REALLY REALLY sure you’ve got the hose routing ‘covered’ at the limits of steering and suspension travel, no abrasion, etc.
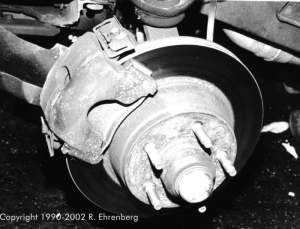
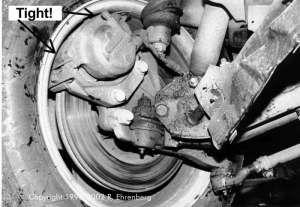 HereÂ’s the fat rotor, 15-in wheel setup from the rear. As you can see, no way are 14-in. wheels gonna clear this setup.For proportioning valve installation, hack through the brake line and armor at a point approximately 17″ forward of the torsion bar crossmember. It’s not critical.
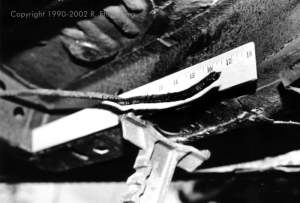
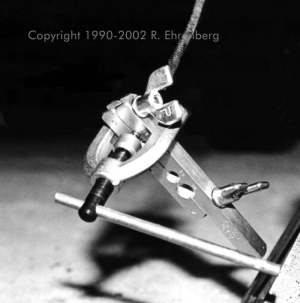
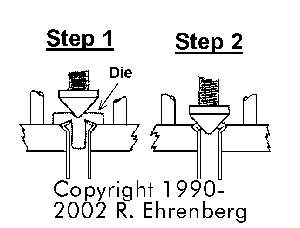
Unwind and discard about one inch of armor from each of the cut ends, and double flare the tubing, using a tool such as this. The ends must look like the drawing when youÂ’re done. And – remember to slide the tubing nuts on before you flare the ends!
Hook up the proportioning valve, observing “F” and “R” labels. Newer Wilwood-sourced Mopar Performance valves are smaller, and require flare-to-pipe-thread adapters. Mount with sheet-metal screws. Since the line forward to the “tee” is so short, itÂ’s easier to just make up a totally new one. Just get a length of 3/16″ tubing from the parts store and cut to the required dimension. Be sure to use the spiral armor and double- flare the ends.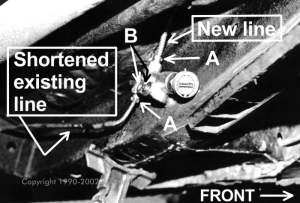
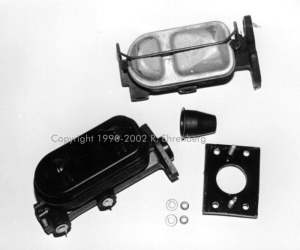 Iron, 4-bolt master cylinders are a straight bolt-in swap. Later, aluminum ones (bottom) require the MP adapter plate (see text) and a seal boot. The boot doesnÂ’t quite clear the large hole in the adapter, so you have to enlarge it to fit with a round file or die grinder. Do not use a cylinder from a FWD car! (Units from late-model trucks, or the MP units, are fine). See text for a discussion on bore sizes.Any master cylinder used with manual brakes must have a machined recess in the back of the piston to accept the rubber pushrod retainer (most have it, but be sure check).
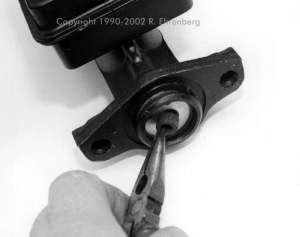
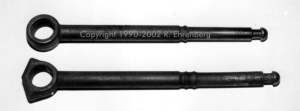 Each body style requires a specific pushrod, which can be recycled from a drum setup, but be sure to pull the pushrod out of the old cylinder before removing it from the car – way easier that way. Alternately, you can use an new MP adjustable pushrod, p/n P5249316.If you use a 4-to-2 bolt master cylinder adapter with power brakes be sure it places the primary piston in the exact stock location — not all do (the excellent one from AR Engineering does.) Alternately, you can, on some cars, swap to a later 2-bolt booster such as this.
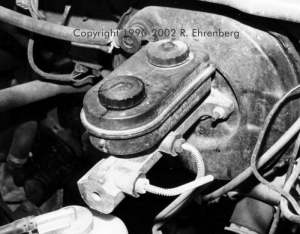
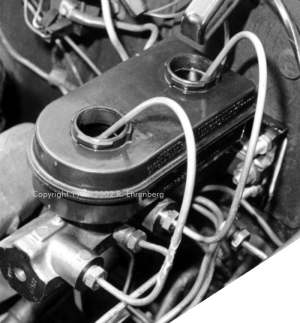 Whichever master cylinder you choose, it must be “bench” bled. This is actually way easier to do on the car. All you need are a set of homemade bleeder tubes. Pump very slowly, to the floor, at least 12 times. An even easier, though sloppier, way to accomplish the same task is to hook up the car’s lines, then use each fitting as you would a bleeder screw. Requires an assistant. Makes a mess.Out back, your drums are fine, no matter what size
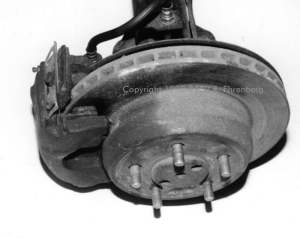 Imperial rear discs are more trouble than they are worth. Trust us on this!
MISCELLANEOUS CAVEATS
Four other points may require attention, depending on the year of your high performance Mopar:
>> What to do if your car doesn’t have a power booster? Simple. Forget it! Unless you have a 5,000-pound wagon, you’ll do just fine without it. You can tailor the pedal pressure to your liking by playing with master cylinder diameters. Smaller cylinder = less pedal pressure required. Larger cylinder = ”harder” pedal, less travel. In any case, if you are either staying with, or swapping to, a manual cylinder, be sure that the unit you use has the machined recess in the back of the piston for the rubber pedal-pushrod retaining ring. Most rebuilt master cylinders we’ve inspected all have this recess. Then, reinstall the pushrod salvaged from your original (drum) cylinder, with a new rubber retaining ring (Mopar p/n 2074960, discontinued, but they are usually supplied with most rebuilt master cylinders).
>> If you have a pre-’67 car, it wasn’t equipped with the desirable dual brake circuit setup. You could embark on the unenviable task of locating the rare ’66 disc-brake master cylinder, or, you can take this as the ideal opportunity to convert to the ’67-up tandem master cylinder/plumbing/tee setup. With a junkyard donor vehicle, this is a straight bolt-in swap.
For a really fast, slick, and easy way to upgrade to dual circuit brakes, see “Pumping Points”, Mopar Action, April 2005 issue. This swap even works if you’re lazy and are staying with drums!
>> 1970 and earlier cars used left-hand thread lugs on the driver’s side. If you’re determined to retain these, you’ll have to change the studs in one of the new rotors to LH thread.
>> In the mid-1970s, Chrysler eliminated the rear brake residual pressure valve from the master cylinder. Its function was to prevent any air from sneaking into the system via the rear wheel cylinder cups. In its place, Chrysler substituted “expanders” in the rear wheel cylinders. (Expanders are dish-shaped steel inserts that exert outward pressure on the cups.) If you should decide to use a master cylinder from a 1975-up car, be sure you have the expanders in your rear wheel cylinders. For at least 20 years they have been universal in all replacement wheel cylinders and rebuild kits.
>> No matter which master cylinder you decide upon, be sure you bench-bleed it thoroughly before you hook it up; see a factory service manual for procedures, but remember that it’s actually much easier to bench-bleed with the cylinder mounted on the car, but with bleeder tubes hooked up.
>> To avoid confusion in the rotor size / caliper type selection and parts procurement process, think of the braking components as complete systems. There are two rotor sizes, and two types of caliper (pin and slider). You can swap amongst the setups as longs as you use all the correct, matching components. If you go for the large rotors, you must have caliper adapters designed for such; if you use slider calipers, you must have slider-version adapters.
WHEEL DEAL
Our parts list is as complete as possible, and we have taken great care to include virtually everything you’ll need. Bear in mind, though, that 15″ wheels are needed to clear the giant 11.75″ rotors (see fig. ** ). If you can’t bear to part with your mint 14″ rallies, no sweat, we have the cure: Use the “optional” 10.87″ HD rotors and adapters shown on the parts list.
WHOA JUICE
Silicone brake fluid (DOT-5) is another good idea. Besides the well known advantages of freedom from moisture absorption and a very high boiling point, it won’t damage the $3000 paint job on your HemiCuda if you get a little sloppy bleeding the brakes.
Now for those owners of cars not covered above, here are some tips for braking upgrades and swaps:
’62-’72 A-BODIES (Dart, Duster, etc.)
If your car now has 9-inch drums, the first step up would be the 10″ drums used on all ’65-up 8-cyl cars. We frankly wouldn’t drive an A-body over 40 mph with the 9-inch drums, for reasons having nothing to do with the brakes. The small ball-joint-to- knuckle bolts, which are loaded in shear, are known to snap, usually at the most inopportune time.
The 10-inch, ‘65-72 drums are a simple R&R bolt-on. You’ll need a set of the 10″ drum ball joints and the aforementioned larger bolts, of course. The next step up, incrementally, would be to use the factory 4-piston Kelsey-Hayes setup. This has the advantage (or disadvantage, depending on your point of view) of keeping the weird 4-inch bolt circle hubs. If you go this route, you’ll still need to swap master cylinders and add a proportioning valve as we outlined in the main text. But these brakes arenÂ’t cheap or common anymore, and are prone to piston siezing if left unattended for any length of time.
The ultimate swap would be the unicast rotors (either size) as outlined above. To do this, you’d need everything in our parts list plus a pair of upper control arms and all four ball joints from a ’73-’76 disc-brake A-car. For factory sway-bar cars, the same caveats apply to the A-bodies as we outlined in the main text for the late-sixties B-cars. But then youÂ’ll have brakes up the yazoo. Incidentally, this is what stops the famous Mopar Action “Green Brick”.
’73-’76 A-BODIES
These cars came in two flavors, drum and disc, with the drum cars being similar to the ’72-down cars (see above), with the main difference being the use of the larger ‘73-up B/E-body inner wheel bearing. The disc-equipped cars already have unicast rotors, but they used slider-type calipers. The cheapo upgrade is just swap to semi-metallic pads (slider type) and be happy. You can also use the 11.75- inch rotors and yet keep your slider setup by simply using caliper adapters from a ’76-up slider- equipped B-body (these were typical on the 2-door versions such as Cordobas). You can also go all the way to the less-likely-to- stick pin-type calipers. For this, just use the adapters on our parts list, along with pin calipers from a ’73-up B-body. This is handy because the ’73-up calipers use the same hollow banjo-bolt hose attachment method as the original slider calipers, and you’ll be able to retain your original hoses.
’73-’75 B-BODIES (Charger, Satellite, etc.)
These cars are also factory equipped with unicast rotors, but they came with pin-type calipers. A change to the larger rotors requires only a simple adapter change (to the ones shown on the parts list) and nothing more. No knuckle or caliper swap is required. The calipers on these cars mount toward the rear of the car.
’76-UP B-BODIES (Cordoba, Fury, etc.)and ‘79-up R-BODIES (St. Regis, etc.)
This group obviously already has the big rotors, etc., as these are the primary “donor” cars for our swap. For H.D. runnin’, though, be sure you’ve got the reinforced rotors and semimetallic pads, and you’re ready to rock and roll. Cars equipped with slider calipers may, if desired, be converted to the K-H pin style via an adapter swap. Use the ’73-up calipers (banjo-bolt hose type,) of course.
F-BODIES and SPINOFFS (Aspen, Mirada, Diplomat, etc.)
We’re referring here to all VolarĂ©s, Aspens, Miradas, Diplomats, etc. These cars use the 10.87″ unicast rotors and slider calipers. As we mentioned under the later-A-body heading, you can swap up to the 11.75″ rotors by simply changing to the appropriate adapters. A changeover to pin-type calipers, if desired, also requires only an adapter change, being certain to use the ’73-up style pin-type calipers.
‘65-‘73 C-BODIES
Early disc-equipped incarnations of these cars used Budd 4-piston brakes, later models had K-H pin type calipers. The K-H brakes are huge (1ÂĽ” thick), in fact, they are more closely related to D-truck and B-van brakes than they are to any other Mopar passenger car. C-body disc brakes can’t swap to/from any other Mopar passcars, and vice-versa. They are, literally, a class by themselves.
Along with the rest of ChryslerÂ’s models, C-bodies went to 1- piece unicast rotors in 1973 (actually, C-bodies made the sap in late ’72). This necessitated a knuckle redesign. The result is simple: for good, lowbuck brakes, with ready parts availability, you need to find a junked (or parked, if youÂ’re quick) 1973 (or late ’72) disc-equipped C-cruiser, and take everything (incl. rotors, calipers, knuckles, hoses, adapters, etc.) You wonÂ’t need the control arms, since they are identical from 1965 thru ‘73. For cars now equipped with 4-piston brakes, you will, however, need to swap the lower ball joints; but this is a blessing in disguise: The needed ball joints are way more common (read: cheaper!)
Another option for C-bodies is the Scarebird kit, see Mopar Action’s December, 2009 issue. This uses stock drum knuckles, lowbuck custom adapter brackets, and a clever mix of parts-store components.
READ IT AGAIN, SAM
A warning needs to be repeated at this point: If you plan to use the 11.75″ rotors, you must have at least 15-inch wheels. This applies to all of the above swaps.
DIALING IT IN
Not much to do here except for getting the proportioning properly adjusted. HereÂ’s the procedure that works for us: First, find a wide, lightly-traveled road and choose a day with light rain. Load the car with whateverÂ’s typical for you, set the tire pressures, etc.
Begin with low speed stops. Keep increasing brake pedal pressure until one wheel locks. Adjust the valve so that it becomes random whether that wheel is a front or a rear. Having a friend nearby in a second vehicle can be helpful in determining which wheel is locking, but be careful! Adjust the valve so the wheel that locks is a front at least 9 out of 10 times, then go about 1/2 turn more. recheck at higher speeds, but safety first.
Adjusted this way, proportioning will be correct even on dry pavement. But if you ever find a rear locking first, donÂ’t hesitate to readjust.
CONCLUSION
Comparing brakes to some of their contemporaries, stock ’60s Mopar musclecars were somewhat advanced. Proof? Check out the brakes on, say, the ’64 Pontiac GTO. Brakes? What brakes? 9½-inch drums, the same as a 6-cyl 2-speed Tempest. A ’64 383 Plymouth Fury, though, had fat 11×3-inch drums – not too shabby for 1964, right?
The ’71 Imperial had true, computerized anti-lock brakes (called Sure Brake) at a time when Mercedes probably didn’t even know what ABS was! Tell that to the new owners from Stuttgart!
If you follow our instructions to a T, your classic Mopar can have braking power that not only complements its earth-rotating acceleration, but outstops many of the industry’s best for the new millenium. The rest is up to you – and your tires!
Text and Photos
by Richard Ehrenberg
THIS ENTIRE WORK COPYRIGHT 1990-2002 BY RICHARD EHRENBERG AND HARRIS PUBLICATIONS, INC.
Protected under Pan-American and international copyright conventions.
Printing, publishing, distributing, copying, etc., by any means, electronic or otherwise,
Is strictly prohibited.


Comments are closed.