
Click to Load Pictures Full Size
Readers Projects ’68 Barracuda


Background | Teardown | Bodywork | Suspension | Interior | Body | Drivetrain | Misc
Background, Why I built the car.
Since the age of 15, I have been tinkering/rebuilding Mopars on and off for almost 30 years. Like many things, you tend to bounce around from one hobby to another, but after attending the “2001 Hot August Summer Nights (Reno, NV), I got the car bug again. I thought about building a E-body car, but they were already getting a lot of attention and costing a pretty penny to say the least. I was looking for something that was different, but showed a lot of character. The decision was made to focus on a late 60’s version Barracuda. Now the hard part, finding the car to start the project. After a while of searching, I found the car located in Santa Ana, CA. I remember it well when I flew down (from Portland, OR) to pick up the car and drive it home. It was just a few days after 9/11 and I was on one of the first flights out of Portland to go and look at a prospective car. At any rate, I purchased the car for $2600 from an automotive repair shop. It seemed the car was kept in one family and they daughter who now owned it no longer wanted it. The shop sold it on her behalf and I drove it home. The ride home was a breeze except for the last few miles when the taillights went out and I was pulled over by the police. Lucky for me, he was a car buff and let me go on my way home as long as I used hand signals. Ironically, as I started to clean out the car of misc. paperwork, I found several original receipts for repairs over the years and the original sticker showing a price of $4015.15. Needless to say, I have spent 10 times that in the repair process. The pictures below shows the car at home, the project begins .


 Original configuration – sticker data
The car was originally purchased at Valley Chrysler-Plymouth, Reseda, CA with the following options below. What a price difference to today’s cars ..
Below outlines the complete parts list to date as to what was done to the car. Bottom line is $44,000 later, its up and running ..


Teardown
The restoration process stared with the usual routine, take all the parts off the car and see what you really have to deal with. From day one, I knew that I wanted this car to be a muscle car, not a numbers matching restoration. So, certain decisions had already been made regarding the drivetrain. Basically, the entire drivetrain would be pulled and given away to anyone that wanted the parts. All firewall components were removed (external wiring harnesses, heater, A/C system, windshield wiper motor, power brakes, etc.)
The entire interior was pulled out except for the dash pad and electrical wiring harness


Any removable body parts were pulled off the car (doors, hood, trunk lid, fenders, bumpers, grille, glass, seals, etc.). The next step of the teardown was the beadblast process. Basically, put the car in a paint booth and use a beadblast (plastic media) process to get rid of all the unwanted paint. This is where you really see what condition the car is in.


Bodywork
 All the Body work was handled by self employed bodyman who had a lot of experience in doing paint jobs like this as well as near perfect show cars. He basically took the car after being bead blasted and looked at the worst spots to see what he had to deal with. There were really two main areas of concern, a leak around the rear windshield, and a slight dented rear quarter panel from what looks like the results of a slight fender-bender.
Windshield Leak & Damaged Quarter panel
The leak was fixed using new metal, the quarter panel just needed some TLC and all is fine once again.
The next step was basically blocking the entire car and getting rid of all the door dings from the past 35 years or so. Hey, what the heck, all of start to look a little rough around the edges after 30-40 years of abuse.
Added Hump for 4-Speed Transmission


The next step consisted of laying down a dark blue primer for the Plumb Crazy Purple color I selected. Purple was always one of my favorites even thought the factory only offered it for a couple years. Once the blue was set in place, he painted the car purple, the finished with several layers of clear coat to give the nice gloss touch.
In addition, all interior metal trim parts were cleaned up and painted semi-flat black to help sharpen up the interior. The top section of the doors (interior) was also painted semi-flat black as well to help accent the door trim once installed.


Suspension
Front End
 The entire front end was stripped after the car was returned home from the body shop. All front end parts were replaced with new components, Polyurethane bushings, Hellwig Swaybar. The addition of the swaybar required some custom made brackets that had to be welded to the lower control arm since the original arms didn’t have brackets on them from the factory. I ended up going this route since I had already bolted the front end together, attached the swaybar with the hardware sent by Hellwig and realized it wouldn’t hold very long. So, I designed my own brackets and had them welded onto the lower control arms, problem solved. While I was doing the front end, I also performed a disc brake (11 Inch, 4.5″x5 lug pattern) swap. Basically pulled the brake setup off a 73′ Duster and bolted up to the Cuda. I had to get some custom brake lines, but I made sure they were clearing all parts throughout the full range of steering.


The rest of the car received new brake lines throughout, not to mention a Proportioning valve from Stainless Steel Brakes Corporation. In addition to that in the picture below, Heavy Duty Torsion bars (2 sizes larger than stock) and subframe connectors were added to the car to stiffen up the suspension and ride.
Rear end
I rebuilt the rear drum brakes as they came from the factory, couldn’t really justify the expense of purchasing a rear disc brake kit.
The original rear end in the car came with a 7 1/4, which was not a good match for what I had in mind. Given that A-body rear ends with a 4.5″x5 bolt pattern were rare to say the least, I had a B-Body 8 3/4 rear end cut down to fit the Cuda. A pumpkin with 3.55 gears was purchased and rebuilt as a starter gear for the car (I need to go with lower gears having tried this for a while). I also set the pinion angle after using a homemade indicator (protractor with a weight). Not as fancy as the new tools, but close enough for what I needed. I ended up using Mopar shims to rotate the pinion up 2 degrees. HD leaf springs were chosen to replace the old worn out parts. Undercoating was re-applied underneath the entire car, just love the smell of that stuff .


Interior
The interior started out with the restoration of the dash area. The instrumentation panel, stereo, and misc. trim pieces were removed from the car. The dash pad was left alone since it was in good shape. Unfortunelty, during the removal of the instrumentation cluster, the small electrical pins on the back of the circuit board broke off. That in turn created somewhat of a choir in rebuilding the board. I found a donor board that was in better shape, but I still ended up repairing the pins on it as well, just not as many as the original board. The instrument panel itself was sent to Mr G’s for restoration along with a few plastic door parts that needed to be rechromed.
One of the other changes I made to the gauges in the instrument panel was bypassing the Amp gauge for an external voltmeter. Given the history and reliability issues, I figured the voltmeter to be a better bet. In addition, I found an article on the Internet that showed how to create your own Solid State Instrument voltage regulator. What the heck, seems like a good idea, so I built one and tested it. Worked like a champ.
Once this was installed and tested, I setup the fuel gauge sensor to check out the Fuel gauge and perform any minor adjustments to it for calibration. A little reading and homework seemed to do the trick on this one vs. having it sent out and rebuilt.
The fan switch was another part that wasn’t working on the car either. You can’t get new ones of those, so another exercise in disassembly, repair, and reassembly was required. Again, it was test prior to installing it in the dash. Once it’s in the dash, you’ll need the hands of a small child to get it out again. Now to the fun part, installing the instrument cluster back in the dash. I decided to install the radio first knowing full well that the space back there is already way too little.
Once that was in place, the cluster went in next, very slowly that is ..
New carpeting was installed in the car, along with Door panels, headliner, and completely redone seats. The car originally came with buckets, but the idea of driving around on vinyl wasn’t too appealing given today’s choices in materials. The following pictures capture the results of the interior at completion.


Body – Assembly
 After all the paint work and chassis work was complete, the fun continued with the assembly of all the misc. body parts back on the car. The best way to do this was to start from the rear of the car and work forward. All new seals (trunk, doors, windows, hood, firewall, you name it) were purchased and installed throughout the car. The trunk was a little entertaining to adjust and get in the right position, it’s not perfect, but its close enough. The rear windshield was replaced since the old one had way too many scratches from some unknown object that used to live in the trunk. It was almost a chore finding someone that remembered how to install the front and rear windshields.
The next step of the process involved attaching the doors to the car. Alignment is a bit tricky here as things rarely go back together in the same spot they were taken apart. Getting the good old fashion “door slammer” effect was key. I rebuilt the hinges myself (new bushings) to get rid of the door sag. Again, not perfect, but certainly better than what it was. Hey, none of us who have been around for a while have the same curves as we did in our teenage years .
 Once that is lined up, the fenders came into play. I used good old fashioned cardboard for spacing the fender between the door and hood locations to get a consistent even gap. Once the gaps are right, time to tighten it down double-check the alignments.
The wheels are Ultra 50 from Les Schwab, tires are Goodrich TA radials, P21560R15 for the fronts, P23560R15 for the rear.
 A close up of the drivers side door showing off the interior and chrome trim. The trim was a royal pain to polish up. Parts that didn’t clean up were replaced with better ones from the local salvage yard. The other piece that was entertaining was the window alignment process. For a first timer, this can be somewhat of a chore to get this right. Once you get it figured out for one side, the other side is much easier (usually
.., but not always)
A close up of the drivers side door showing off the interior and chrome trim. The trim was a royal pain to polish up. Parts that didn’t clean up were replaced with better ones from the local salvage yard. The other piece that was entertaining was the window alignment process. For a first timer, this can be somewhat of a chore to get this right. Once you get it figured out for one side, the other side is much easier (usually
.., but not always)
The next section dealt with the grill pieces. Those were taken to “Alltrim” outside of Portland, OR. He does nice work, but does have a long turn around time for the parts (months). Patience is the key here. Once I got the parts back, I took the time to carefully line them up and install them back in place, luckily no adjustments were required for the fenders or header section.
The firewall section in the engine compartment was next on the list of tasks. All parts on the firewall were replaced with rebuilt or new items (Blower motor, Wiper Motor, Power Booster, Master Cylinder, Heater valve, etc.). The lines for the A/C were left off, sorry no A/C for this muscle car. It subscribes to the 260 A/C theory, 2 windows down going 60 MPH.


Drivetrain – Engine
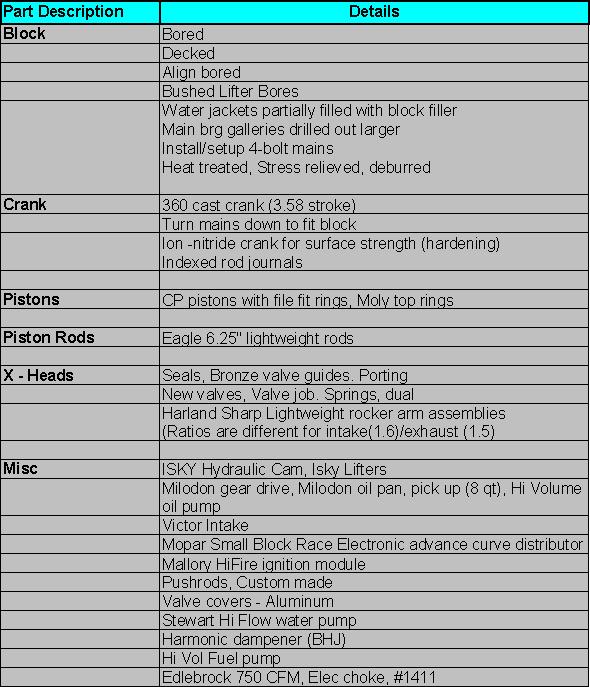
The 340 engine is literally the heart of the car. I basically spent some time talking to a few engine builders before I found one that I liked. I had built engines in the past, but this one was going to have more done to it than the previous versions and I wanted someone who had the experience to deliver. The requirements were fairly simple, run on Premium gas, rough idle acceptable, carbureted application, as much HP/Torque as possible. My first choice was the CAM, once you get that picked, you build the engine around it. For simplicity’s sake, I have captured the parts list in the table below to give you an idea of what went into the engine along with a few pictures as well. Once complete and dyno’d, the engine came in with over 450 HP and 400 Ft-Lbs of torque. The good news is the torque peaks around 4000 RPM and doesnt change much from there on out.


Drivetrain – Transmission
The transmission was anther touch choice. I knew I wanted a manual transmission to really enjoy the car, but the issue of balancing low gears for highway driving is always a challenge. If I went with the stock A-833 4 speed, my ears would most likely be ringing for sometime after a short run on the highway (Mileage, why bother ). I looked at Tremec’s 5-speed setup, but its a bit pricey by the time you get all the misc. bells and whistles to make it work. The option I went with was nothing new, but it does look like more people are checking into it these days. Basically its the A-833 with the overdrive gearset and aluminum tail shaft (Passons Performance seems to be building more of these units). At the end of the day, I may be pushing the transmissions limits a bit, but what the heck, lets see if it will work. All the Z-bar linkage was purchased new, along with a McLeod 10.95 Clutch, throw out bearing, and Borg/Beck Long Pressure plate. To help protect the legs, I also purchased a Lakewood blow proof bell housing. The bell housing was located with a dial indicator and new dowel pins so the tranny lined up nice and neat with the crank.
 The bell housing also had a number of other issues that had to be sorted out. The Z-bar linkage needed to have the shaft shortened a bit to clear the bell housing, the flange around the bellhousing was also interfering with the exhaust system (installed later on). That little issue caused a bit of cutting and grinding to get clearance for the headers. From what I see, Lakewood never bolted one of these up to a small block in an A-body, not to impressive.
Removed bell housing flange section for header clearance
The engine and transmission were installed as a unit into the car at the same time. That was a pain to say the least. There were a number of tight spot areas that caused a lot of trouble during installation (Bellhousing to firewall clearance, K-frame to oil pan clearance, headers, etc.) I doubt if I will go that path again, probably easier to split the two and go at it that way instead.
Misc – Steering
 The steering column (manual transmission style) was one of those items that I picked up from a junkyard and rebuilt from top to bottom. One of the entertaining parts was the lower bearing assembly that was basically a plastic sleeve with some sort of outdated bearing that was nowhere to be found at the time of this project. So, A little design and manufacturing led to a bronze self-lubricating bushing to replace the entire assembly. Not only did I eliminate the plastic part that wouldn’t last against the heat, I eliminated multiple parts in the process and came up with a simpler design. The next area of concern near the headers was the old style steering coupling. I purchased a new u-joint style unit from Flaming river, but still ended up modifying that to work similar to the original coupling. The Power Steering pump and unit were both rebuilt by Durex. By the way, Durex is one of those companies that still understands the term “Service” (ask for Tregg).
Bronze lower bushing & Flaming River Coupling – Modified to work right
Misc – Relays and other electrical items
 Electrical mods for the Cuda included
·Headlight relays
·Fan relays·Creating a terminal connector for Battery and Ignition power sources
·Relocating the battery to the trunk
·Swapping to a one wire alternator with a built in regulator
·Electric fuel pump,
·Bypassing the Amp gauge to eliminate a known trouble spot.
A bit of homework was required for most of this since it was new to me. I found a few decent web sites that seemed to help, one of which was called Mad Electrical (another person that was very helpful).
Misc – Fuel System
 Fuel system upgrades included a Mallory 110 GPH pump, Fuel tank sump, BG filter, Painless Fuel pump relay, braided hose, fuel gauge, and a UEGO A/F Ratio gauge for tuning purposes. The sump was welded to the aft end of the tank to catch the fuel when you hit the gas. A BG filter cleans the fuel as it heads up to the pump, just forward of the rear wheel. From there, it runs all the way to the fuel gauge, then the carb to feed then engine.
Misc – Electric fans and March Pulley system
 A March pulley system was used to supply power to all the engine accessories (Water Pump, Alternator, PS unit). The pulley and nose cone for the water pump had to be modified since the pump came from Stewart (High volume pump), who uses a larger diameter shaft. Slight modifications were also required to get the one wire alternator to line up properly (within about .025″) such that the belt stayed in place.
 After adding the new pulley system and accounting for the larger than stock Griffin Aluminum radiator, little room was left for an electric fan setup. Once again, a little engineering was in order. After doing a little homework on the SPAL fans, I estimated that two 11-inch pusher fans would be enough to keep the car cool (so far its worked like a champ). Of course, the next trick is how to mount them in place without butchering the front end of the car. Using a little aluminum, I was able to create a frame for the fans that leveraged the existing holes for the radiator.
Misc – Exhaust System
 TTI’s 3 inch exhaust system was used for the car. I went with the ceramic coated headers and the X-pipe configuration. Dynomax mufflers, There is not much room for clearance with this system, basically you move it around until you get it where you want it, tighten everything up and hope it doesn’t move.
Misc – External Oil system
 A pre-oiler setup was installed to provide oil to the block before starting. I went with the 2 qt Accusump system from Canton Racing. The valve allows the reservoir to recharge anytime during operation, but only provides oil to the block via a switch inside the car. In addition, I ran braided lines to an external filter, pre-oiler, and back to the block.
Comments are closed.